Have you ever thought about preparing and making your own pumpkin seeds?

They’re super simple, make a nutritious snack or a bonus garnish crunch to a salad or soup.

Why eat pumpkin seeds?

Believe it or not, the seeds of pumpkin are a very highly packed nutritional food.

They contain magnesium and vitamin K, both important for wound healing, zinc which is fantastic for supporting immune function, sperm quality and cell growth.

In addition they contain phosphorus, copper, iron and antioxidants.

They are high in protein, rich in healthy fats and contain some bonus fibre.

Some people even suggest they may help promote sleep as they contain tryptophan.

And best of all, it is making use of something that often ends up in the compost bin.

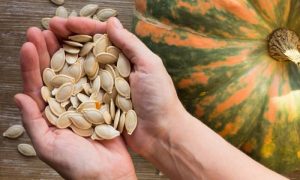
It’s also a good one to get the kids to help with, as getting kids helping in the kitchen can work wonders on them trying new foods.

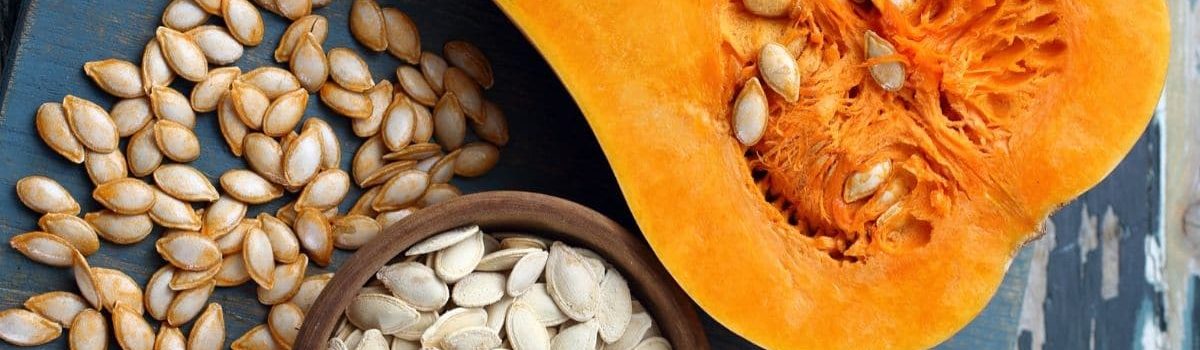
Firstly it is helpful to know that pumpkin seeds contain two parts, the outer cream coloured shell and the inner pepita, which can be light brown to olive coloured.


Follow our easy step by step guide to make a perfectly roasted pumpkin seed.

1. Remove the seeds

Using a metal or wooden spoon, or if you prefer your hands, gently scoop the seeds from the centre of the pumpkin.

Remove the pulp and inside stringy bits that connect the seeds together.

Approximate time: 1 minute

2. Wash the seeds

This is most easily done by placing the seeds in a colander or strainer, but if you don’t have one of those, just place in a bowl of water and remove any additional bits of left over pumpkin.

Approximate time: 1 minute

3. Dry the seeds

Drain the water from the seeds and gently pat the seeds down with a tea towel, this helps remove any last traces of pumpkin

Approximate time: 30 seconds to pat dry in warm weather, slightly longer in cold weather.

4. Place in saucepan on a light boil

Cook for approximately 8 minutes.

This is the secret part of the recipe, as pre boiling softens the outside shell and gives you a much tastier result, but if this sounds like too much hard work, skip and go straight to roasting.

Approximate time: 8 minutes (optional)

5. Dry seeds

Repeat, do a good job this time as it improves the result.

Approximate time: 1 minute

6. Season the seeds

For flavour, season with salt, pepper and or any other herb or spice that takes your fancy, I personally like to use a little paprika.

Approximate time: 30 seconds

7. Line a baking tray with baking paper

This stops the seeds sticking to each other or the tray.

Approximate time: 1 minute

8. Place in oven 120 degrees

Cook for approximately 10 minutes.

However if you happen to be cooking something else at a higher heat, you can cook at the same time, but make sure you check on them every couple of minutes to ensure they don’t burn.

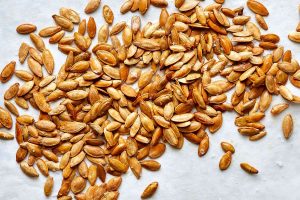
They should be lightly golden brown.

Approximate time: 5-10 minutes (depending on oven temperature)

9. Eat your seeds

Give them a minute so you don’t burn your mouth, but otherwise they’re delicious warm or cold.

You can store your pumpkin seeds in an airtight container for up to 2 weeks.

Let us know what you think of your freshly roasted pumpkin seeds, we hope you like them!

Read More

Make the most of your vegetable crisper, reduce waste, save money and nutritious simple kitchen surplus vegetable stock.

This makes a great base for soups, stews, slow cooks and sauces.

Or you can add some extra fresh veggies, small amount of meat or noodles for a light meal or snack.


Ingredients (follow very loosely) for 1 serving

  • Onion, tops, bottoms, and skins
  • Celery, tops and bottoms
  • 1 cup carrot (225 g), tops, bottoms, and skins
  • Mushroom, stem
  • Garlic, tops, bottoms, and skins
  • Potato (any type), tops, bottoms, and skins
  • Parsley, stems, including when herbs have gone to seed (or any other herbs such as coriander, rosemary, basil, thyme)
  • Water, as needed
  • Salt and pepper to taste

Please note…..

Can add other leftover vegetables such as zucchini ends, tomato tops / bottoms / skins, corn, beans, lentils.

It is best to avoid cauliflower, broccoli or brussel sprout stems as it can make the stock taste bitter.

Preparation

Remove the tops/bottoms/skins/stems from any vegetables you are preparing and place them in a freezer bag or sealed container – they can stay frozen up to 6 months.

Note: You can add many other vegetable scraps (especially the sweet ones!) – i.e. corn cobs, squash, pumpkin, zucchini, and other squash, beet greens, fennel, chard, lettuce, parsnips, green beans, pea pods, capsicum, eggplant, asparagus, and herbs like dill, thyme, parsley, and basil.

Continue stockpiling until the bag is full.

Place the contents of bag or container into a pot and fill ¾ of the pot (or until scraps just start to float) with water.

Bring water to a boil and then let it simmer for at least 30 minutes.

Strain water out of stock.

Refrigerate stock up to 4 days, or freeze up to 3 months.

Enjoy!

Read More

When you put healthy and wealthy in the same sentence, do you automatically think of other people?

When living on a budget (which is something we could all do) it is important to consider all the essentials.

Sometimes people are tempted to be less healthy in order to save a dollar.

But firstly is that really a good idea and secondly are there ways you can do both?

Over the next few weeks, we are going to review simple ways you can save money, continue making healthy choices and live life with more abundance.

This week’s theme is “what can I save from my garbage bin?

On average about half of our rubbish bins are filled with organic material, mostly food scraps!

That’s right, about 4kg per week for an average household.

Now you may be more or less than that, but what can you eat and save from what you already have?

And how can we make it delicious?

We will outline a series of simple steps that you can start today and quickly see a difference to your grocery bill.

1. Audit your waste

Firstly, audit what’s getting thrown out, that could be in the rubbish, the compost, getting washed down the sink or given to the dog.

At first it may be a bit of a shock when you really start to pay attention.

Now think about the bits you usually discard.

2. Plan to Repurpose

Or maybe there are some things going to waste that could be used differently, such as food packaged in oil.

If it makes that delicious, chances are it will be good in salad dressing, for stir fry, a stew or baking.

The end of a zucchini or onion, the carrot/potato peel, pumpkin seeds just to name a few.

Lots of perfectly good vegetable ends and peel can be saved, frozen and used to make stock click here

Pumpkin seeds are highly nutritious and only take a few minutes to make into a healthy snack click here.

Then there’s citrus peel……

This one is a tad contentious as I know I don’t like a big hunk of peel in my hot cross bun (you either love it or you don’t).

But what else can you do with it?

Grate lemon rind into cooking or baking, while orange peel goes well in baking and drinks, or use as a herbal tea.

Then raid the jars and sauces in your fridge and cupboard, what gets left behind could go well into a slow cooked dish, used as a condiment or make a dressing.

What about the random tin of beans or bag of dried lentils or soup mix?

These often can fill out meat dishes (especially mince), use half mince and half lentils in bolognese or tacos & will usually go undetected by fussy eaters.

Save old bread and make croutons (how fancy) or try making bread and butter pudding (this makes me think of my Nana).

Now how can this make you more generous?

It’s quite simple…

3. Save and Give

The more you save, the more you have to give.

This brings up another dilemma, what and who do you give to.

Maybe you don’t have enough (or want to) left over to give money, but maybe you have a meal you can share with a friend or family member you know (or suspect) is doing it tough.

Invite them over for dinner, or pop in and say hi and leave some soup / biscuits etc.

Or if your social circle doesn’t have anyone who springs to mind, there could be an elderly neighbours, a single parent with kids, a young adult who is living out of home with 3 casual jobs to make ends meet.

If you happen to need every meal out of your own cupboard and don’t have any leftovers, share these tips including how much you saved each week / month with a friend.

Sharing your skills and knowledge is generous.

We’d love to hear what you saved from your bin this week.

Seriously, it’s worth celebrating what’s good for you and great for the environment.

Read More

Unless you have been diagnosed with biceps tendinopathy, you’ve probably never heard of it. But if pain, weakness or swelling is something you have around the front of your shoulder continue reading!

Do you experience any of these symptoms in your shoulder?

  • Pain at the front of the shoulder
  • Burning or deep pain before and after activity
  • Limited elbow and shoulder flexibility particularly in flexion
  • The area is warm, tender or inflamed
  • A feeling of stiffness in the shoulder
  • Loss of strength or feeling your arm is weak
  • Are you experiencing a progressive increase in pain’ or worsening symptoms over weeks and months?

Despite the frustrating discomfort, you might be feeling, the biceps tendon is actually a strong cord-like structure that connects the biceps muscle to the bone at the front of the shoulder (the humerus bone).

If it’s strong, why am I in pain?

Biceps tendinitis is inflammation or irritation of the biceps tendon whereas biceps tendinopathy is degenerative changes within the tendon.

Inflammation can cause swelling which ultimately puts pressure on surround nerves which can lead to pain.

This can be the cause of the ache when picking up your handbag, doing those overhead presses at the gym or placing those plates in an overhead kitchen cupboard.

Sound familiar?

What can you do to help your shoulder pain?

Shoulders are infamously known to be unstable and complex joints therefore obtaining a specific diagnosis can be tricky. Booking an appointment with one of our Osteopaths will allow for a comprehensive assessment, hands-on treatment, exercise rehabilitation, and advice for your frustrating shoulder pain.

Treatment of biceps tendinopathy focuses on reducing inflammation and swelling while strengthening the tendon to prevent a tendon rupture.

Surgery is not usually necessary unless a rupture or significant tear is suspected.

cold press

Quick tips for relief:

  • Ice
  • NSAIDS (Non-steroidal anti-inflammatory) medication
  • Keep your arm moving
  • Do not put your arm in a sling

So, when will I be better?

It can take up to 3 months for the pain to settle but long-term strengthening exercises are recommended to avoid a relapse in pain and weakness.

So, what can I do right now?

Book in one with of our experienced and friendly Osteopaths so we can develop a plan TOGETHER.

If this isn’t you BUT you’ve got shoulder pain, come into the clinic, and let’s chat about your shoulder pain.

Read More